How to Add a Image Slider for Colour Variants in Shopify

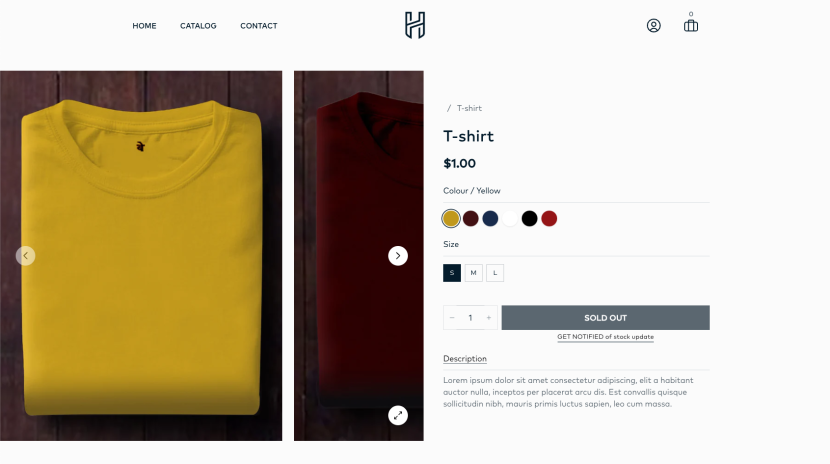
A little while ago we built an image slider on the product page for a clothing Shopify site. Each image in the slider could be a different colour variation of the item of clothing. When a user selects a colour from the options on the right, it should slide to the correct image.
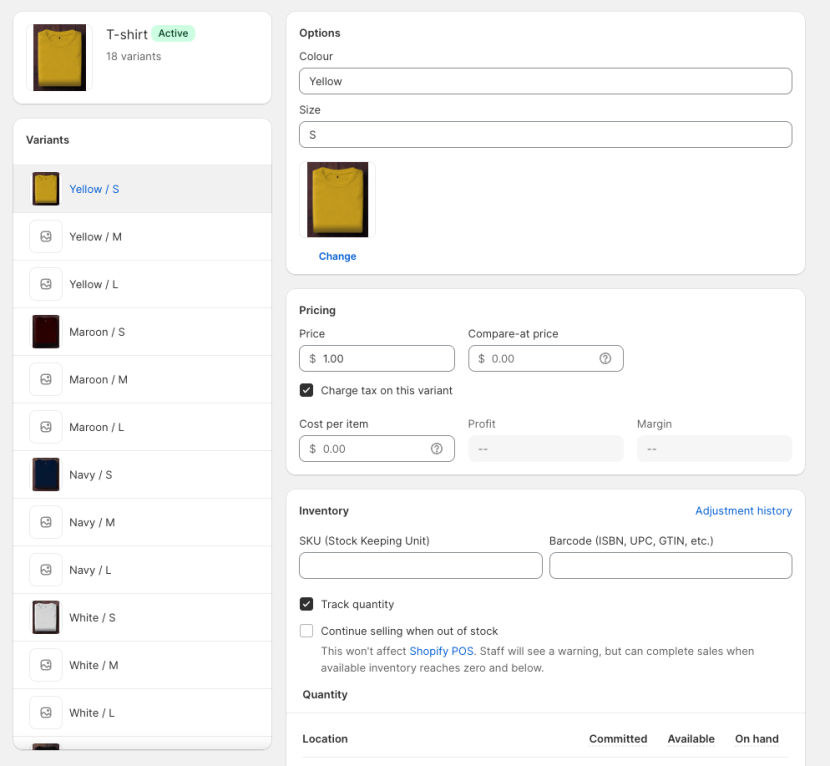
First we want to add our images their respective colour variants. If you have multiple sizes you only need to add the colour to the first size of that colour. Alternatively if you want to display multiple images for one colour you can use the different sizes to add these extra images, as by default Shopify only allows one image per variant.
Now we can get onto the code!
At the top of our main-product.liquid file we're going to define a few variables (with fallbacks for if they don't exist), so we can easily reference those variables later. These variables are for the variants price, stock quantity, availability and the ID.
{%- if product.selected_variant.compare_at_price != blank -%}
    {%- assign comparePrice = product.selected_variant.compare_at_price | money -%}
{%- else -%}
    {%- assign comparePrice = '' -%}
{%- endif -%}

{%- if product.selected_variant.inventory_quantity != blank -%}
	{%- assign variantQuantity = product.selected_variant.inventory_quantity -%}
{%- else -%}
	{%- assign variantQuantity = 0 -%}
{%- endif -%}

{%- if product.selected_variant.available -%}
	{%- assign variantAvailable = product.selected_variant.available -%}
{%- else -%}
	{%- assign variantAvailable = false -%}
{%- endif -%}

{%- if product.selected_variant.id -%}
	{%- assign variantId = product.selected_variant.id -%}
{%- else -%}
	{%- assign variantId = '' -%}
{%- endif -%}
We also need to create an array with the variant ID and variant image (skipping any that don't contain an image). Unfortunately creating arrays isn't very easy with Liquid, especially if they need key:value pairings. To get around these limitations we have to create 2 additional arrays that just contain the keys and values.
To create our arrays we're going to loop through the product.variants , if the variant has a featured_image we'll resize that image and assign it to image .
Then we'll append the variant.id and the resized image to our filteredVariants array, separated by a : and suffixed with a , . This will create a key:value paired item in the array, which should look something like [1:"https://image.url",2:"https://image2.url"] .
We'll also create the 2 other arrays, which will contain just the keys and just the values, this will allow us to loop through filteredVariants and target the key or the value with {{ variantIds[forloop.index0] }} or {{ variantImages[forloop.index0] }} .
{%- assign filteredVariants = '' -%}
{%- assign variantIds = '' -%}
{%- assign variantImages = '' -%}

{%- for variant in product.variants -%}
    {%- if variant.featured_image -%}
        {%- assign image = variant.featured_image | img_url: '850x1050' -%}
        {%- assign filteredVariants = filteredVariants | append: variant.id | append: ':' | append: image | append: ',' -%}
        {%- assign variantIds = variantIds | append: variant.id | append: ',' -%}
        {%- assign variantImages = variantImages | append: image | append: ',' -%}
    {%- endif -%}
{%- endfor -%}


{%- assign filteredVariants = filteredVariants | split: ',' -%}
{%- assign variantIds = variantIds | split: ',' -%}
{%- assign variantImages = variantImages | split: ',' -%}
For this example we're using Alpine.js to assist with the JavaScript, so we'll wrap all the HTML for this file with x-data="productData" , and create a dedicated Alpine component for this.
Inside our productData component we'll set a few JavaScript variables utilising some of the Liquid variables we defined earlier.
<div x-data="productData" class="..." x-cloak>
	...
</div>
<script type="text/javascript">
    document.addEventListener('alpine:init', () => {
        Alpine.data('productData', () => ({
			quantity: 1,
			selectedVariant: {
                available: {{ variantAvailable }},
                id: '{{ variantId }}',
                price: '{{ product.selected_variant.price | money }}',
                comparePrice: '{{ comparePrice }}',
                quantity: {{ variantQuantity }},
            },
		}))
	})
</script>
Now we can create our slider. In this example I'm using swiper.js but you're welcome to use another slider package. I chose Swiper because it has a function for sliding to specific slides, you just have to provide it with the index of that slide.
Here we're going to loop through the filteredVariants array we created earlier, and grab the image URL by targeting {{ variantImages[forloop.index0] }} .
<div x-ref="productSlider" class="...">
	<div class="swiper-wrapper ...">
		{%- for variant in filteredVariants -%}
	  		<div class="swiper-slide ..." style="background-image: url({{ variantImages[forloop.index0] }});">
	  		</div>
		{%- endfor -%}
	</div>
</div>
Next we're going to loop through our different variant options, to separate the colour options from the sizes (or any other variant option you may have added). We'll do this using product.options_with_values and create a select dropdown for each one.
We’re going to give each select an x-ref with the index of the loop, and an @change event of which will call updateVariant() method in Alpine.
{%- for product_option in product.options_with_values -%}
	<select x-ref="select{{ forloop.index }}" @change="updateVariant()">
		{%- for value in product.options_with_values[forloop.index0].values -%}
			<option value="{{ value }}" {% if product.options_with_values[forloop.index0].selected_value == value %}selected{%
endif %}>
				{{ value }}
			</option>
		{%- endfor -%}
	</select>
{%- endfor -%}
We also want a Master select which is a hidden dropdown with every possible variation, this is what we will use when we push a product to the cart.
<select class="hidden" x-ref="masterSelect">
	{%- for variant in product.variants -%}
		<option
{%- if variant == product.selected_variant -%}selected="selected"{%- endif -%}
value="{{ variant.id }}"
>
			{{ variant.title }}
		</option>
	{%- endfor -%}
</select>
The last bit of HTML we want to consider is the Quantity and Add To Cart button. If a variant doesn't exist or is sold out we should disable the button to make sure customers can't add the non-existent/sold out product to their carts.
You might also want to utilise Alpines x-text to update the text inside the button, but for now I'm just going to leave it as is.
<input id="quantity" x-model="quantity" class="..." type="text" name="quantity" min="1" value="1" size="3" disabled>

<button
	type="submit" name="add" class="..." :disabled="!selectedVariant.available">
	Add to Cart
</button>
We're now ready to write our updateVariant() function down in our Alpine component.
First we set the selectedVariantId to an empty string. We do this because if we don’t find a valid variant for whatever reason, the selectedVariantId won’t update and we need to make sure it doesn’t use the previously held value.
Next we loop through the all product variants to check if our dropdowns hold the same value as the variant options 1, 2 and 3. Each check will look something like this this.$refs.select1.value == "{{ variant.option1 }}" .
These checks are aslo wrapped in a Liquid if statement to ensure that the variant option exists. Shopify allows a maximum of three variant options per product, so if the variant option doesn’t exist we don’t need to do the check.
If a matching variant is found, we can update the selectedVariant data variables with our found variant. Then we can check its validity and whether it's in stock.
When the variant is not found or is unavailable, selectedVariant.id will return an empty string. In this scenario we'll update our master select value to an empty string and set the availability to false.
We can check if the variant is sold out using the selectedVariant.id on the master select options, or by checking if the selectedVariant.quantity == 0.
In this instance we will update our master select with the selectedVariant.id, but we need to set selectedVariant.available to false so the user can’t add it to their cart. Because the variant exists we can tell the slider to move to that image.
We haven't written the function for this yet but we add the call to it here with this.slideToImage()
If both of those checks fail we know our variant is valid and in stock. This means we can update our master select, set the selectedVariant.availability to true, and trigger the slideToImage() function.
We also need to check here whether the user has entered a quantity larger than the available quantity for that variant, and adjust the quantity input accordingly.
updateVariant() {
	this.selectedVariantId = '';
	{% for variant in product.variants %}
		if ({% if product.options[0] %} this.$refs.select1.value == "{{ variant.option1 }}" {% endif %}
		{% if product.options[1] %} && this.$refs.select2.value == "{{ variant.option2 }}" {% endif %}
		{% if product.options[2] %} && this.$refs.select3.value == "{{ variant.option3 }}" {% endif %})
		{
			this.selectedVariant.id = {{ variant.id }};
			this.selectedVariant.quantity = {{ variant.inventory_quantity }};
			this.selectedVariant.price = "{{ variant.price | money }}";
			this.selectedVariant.comparePrice = "{{ variant.compare_at_price | money }}";
		}
	{% endfor %}

	if (this.selectedVariant.id == '') {
	  	// Variant Not Found / Unavailable
		this.$refs.masterSelect.value = '';
		this.selectedVariant.available = false;
	} else if (this.$refs.masterSelect.options[value=this.selectedVariant.id] == 'Sold Out' || this.selectedVariant.quantity == 0) {
		// Sold Out
		this.$refs.masterSelect.value = this.selectedVariant.id;
		this.selectedVariant.available = false;
		this.slideToImage()
	} else {
		// Variant Available
		this.$refs.masterSelect.value = this.selectedVariant.id;
        this.selectedVariant.available = true;
        if (this.quantity > this.selectedVariant.quantity) {
        	this.quantity = this.selectedVariant.quantity
		}
        this.slideToImage()
	}
}
Lastly we can add our slideToImage() . It's relatively straightforward, we loop through our filteredVariant array, and if our selectedVariant.id matches the ID of our filterVariant ID we can tell swiper to slide to that image using the loop index.
slideToImage() {
	{% for image in filteredVariants %}
    	var forloopIndex = {{ forloop.index0 }};
        if(this.selectedVariant.id == {{ variantIds[forloop.index0] }}) {
			this.productSlider.slideTo(forloopIndex, 300, false)
		}
	{% endfor %}
},
And here is the end result!
-1763718165.gif)
More Articles

Why Statamic for Membership Platform
Why Statamic works brilliantly as a membership platform for large organisations. Flexible, secure, and built on Laravel.

Laravel for Agentic Development
If you're a founder, CTO, or product manager with a Laravel-powered platform, understanding what these are and what they make possible puts you in a much stronger position to make good decisions.

Eloquent explained: what it is and why it matters
Eloquent in plain English. What Laravel's ORM actually does, why your developers love it, and the questions to ask in your next project meeting.
